I've always wanted a banner for my booth at craft shows, which would ideally describe my work to passersby while enhancing the look of my booth. At a craft show earlier this year, I had the pleasure of having my booth next to fellow craftsperson, Leanne Tremblay of Loomination, who had recently made her own sign for her booth. In addition to being inspired by Leanne's work, I was pleased by the idea that I could have an eco-friendly sign (unlike most banners that are vinyl - very UNeco-friendly), that would also fit the overall vibe of my booth, which includes unbleached cotton tablecloths, dark wood cases, a tree earring display, and purple accents! Though it took a few days to make the banner, I am so glad that I did it.
Here are the materials I used:
- thick canvas or fabric (5 feet long by approximately 28" wide)
- 5/8" dowels (quantity 3)
- duct tape (to attach dowels to achieve correct length)
- hemp string
- acrylic craft paint (one 2 ounce bottle)
I also used the following:
- sewing machine
- scissors
- iron
- pins
- small saw (for cutting dowels to proper length)
- pencil
- computer with design program (I used photoshop)
- projector
- ruler
- paintbrush
Starting with the thick cotton canvas (which I had leftover from the haybale-covers we made for the seating at our wedding!), I determined how far I would need to fold over each side to loosely encase a 5/8" dowel. I ironed and pinned this fold in place, all except for the last eight inches or so on each end.
In this unpinned area, I sewed a buttonhole on each corner (on the fabric that was to be folded over to encase the dowel), so I will be able to easily slip the dowel in and out as needed. This will make it handy for packing and bringing to shows! After sewing the buttonholes, I sewed the hem along the top and bottom, as well as the hem on the sides.
Using dowels to hold the banner are a trick I learned from my mother who is a quilter: a dowel across the top AND bottom will keep the fabric hanging straight and smooth with no weird wrinkles or puckers, and it will help hold it down during windy craft shows! Since the length of the banner was longer than one dowel, I cut the third dowel to make the additional length necessary and duct-taped the cut section on to each full size one. I drilled a hole in each end of both dowels, and inserted and tied a short piece of hemp string. I will attach either hooks or additional string to these loops, depending on how or where I would like to hang it (which may vary from show to show).
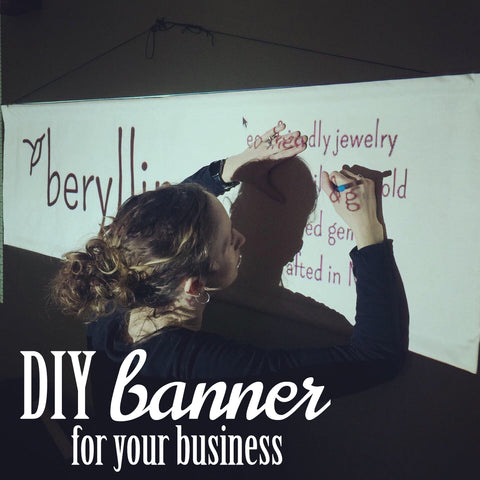
Once I had the banner fully sewn, I hung it up on my wall and used a projector to project the image for my banner which I had created in Photoshop.
Next, I traced the projected image onto the canvas using a pencil with a light touch, and I used a ruler for the straight sections of tracing. I pressed the banner against the wall to trace, which meant that when returning after short rests for my wrists (tracing on a wall is more tiring than you can imagine!), I had to realign the traced sections before beginning to trace again. This ensured that there was no weird misalignment of sections!
Once the entire image had been traced, it was time for the fun part: painting! I was quite nervous about this. Using purple acrylic craft paint on white cotton muslin meant there was no room for mistakes. One drip or mis-brush and it could be ruined!
Painting was very time consuming, since I proceeded very carefully and cautiously. It was well worth the time though, as I am absolutely over the moon with my finished banner. Handmade, eco-friendly, and perfectly aligned with my business, jewelry, and overall style. Stop by one of my
upcoming shows to see my new banner in action!
Update: a refresh for 2019 with my new logo and font! Same process, same fabric. I've upgraded the dowels to steel bars from the hardware store that I painted a beautiful champagne gold. Looking forward to my next show!
Laurie Lynn Berezin
Author
2 Comments
Leave a comment


Laurie Lynn Berezin
Author